Showing posts with label Wordpress. Show all posts

Run a wp_schedule_event Recurrence Every 3 Minutes

By default, wp_schedule_event lets you choose a recurrence interval of ‘hourly’, ‘twicedaily’, or ‘daily’ for WP Cron jobs. Here, I show you how to add a custom recurrence interval of 3 minutes.

You may want to run a WP Cron job every 3 minutes, or so, for testing purposes. To add an interval of 3 minutes to the WP Cron schedules, use this:

function isa_add_every_three_minutes( $schedules ) {

    $schedules['every_three_minutes'] = array(
            'interval'  => 180,
            'display'   => __( 'Every 3 Minutes', 'textdomain' )
    );
     
    return $schedules;
}
add_filter( 'cron_schedules', 'isa_add_every_three_minutes' );

Now, you can use ‘every_three_minutes’ as the recurrence parameter when you use wp_schedule_event:

wp_schedule_event( time(), 'every_three_minutes', 'your_cron_function' );

Scheduled Cron Job in wordpress

if (!wp_next_scheduled('my_task_hook')) {

    wp_schedule_event(time(), 'hourly', 'my_task_hook');


add_action('my_task_hook', 'my_task_function');

function my_task_function() {

    wp_mail('nileshyadav326@gmail.com', 'Automatic email', 'Automatic scheduled email from WordPress.');

}

Get Product Ordered Currency in Woo commerce.

$currency = $order->get_order_currency();

That it.

Custom tracking code for the thanks page (woo themes, Woo Commerce ) snippets

/**
 * Add Tracking Code to the Order Recieved Page
 */
function wc_ninja_checkout_analytics($order_id) {
    $order = new WC_Order($order_id);
    $order_no = $order->get_order_number();
    $grand_total = $order->calculate_totals();
    $shipping_total = $order->calculate_shipping();
    $tax_total = $order->calculate_taxes();
    $currency = $order->get_order_currency();
    $items = $order->get_items();
?>

    <!-- Paste Tracking Code Under Here -->
    <script>
        ga('require', 'ecommerce', 'ecommerce.js');

        ga('ecommerce:addTransaction', {
            'id': '<?php echo $order_no; ?>', // Transaction ID
            'affiliation': '', // Affiliation or store name
            'revenue': '<?php echo $grand_total; ?>', // Grand Total
            'shipping': '<?php echo $shipping_total; ?>', // Shipping cost
            'tax': '<?php echo $tax_total; ?>', // Tax.
            'currency': '<?php echo $currency; ?>' // Local currency code.
        });
    </script>  
    <!-- End Tracking Code -->

    <?php
    // Output the loop
    foreach ($order->get_items() as $item) {
        // Getting some information
        $product = new WC_Product($item['product_id']);
        ?>  
        <!-- Paste Tracking Code Under Here -->
        <script>
            ga('ecommerce:addItem', {
                'id': '<?php echo $order_no; ?>', // Transaction ID.
                'name': '<?php echo $item['name']; ?>', // Product name.
                'sku': '<?php echo $product->get_sku(); ?>', // SKU/code.
                'category': '<?php echo $item['variation_id']; ?>', // Category or variation.
                'price': '<?php echo $item['line_total']; ?>', // Unit price.
                'quantity': '<?php echo $item['qty']; ?>', // Quantity.
                'currency': '<?php echo $currency; ?>'   // Local currency code.
            });
            ga('ecommerce:send');
        </script>  
        <!-- End Tracking Code -->

<?php }  }
add_action('woocommerce_thankyou', 'wc_ninja_checkout_analytics');

Quick WordPress Multisite (MU) Installation and Setup for Different Domains and Sites

WordPress Multisite (or Network) is 1 wordpress installation that enables hosting of multiple different websites and domain names.
WordPress Multisite uses the same wordpress base (including the themes and plugins), wordpress database, and wp-config.php configuration file – for all sites in the network.
To install and use WP MU (Multisite), you would:
  1. Install WordPress on a base website and domain. This installation will provide for all your MU sites.
  2. Activate (turn on) Multisite / Network:
    1. Edit wp-config.php
      define( 'WP_ALLOW_MULTISITE', true );
    2. Go to Tools > Network Setup, select to use: sub-domains, and provide the asked “network” details (primary: domain, title, mail address). Install.
    3. Make sure the displayed wp-config.php and .htaccess changes are made (and if not made automatically, make edits manually).
  3. Install the “WordPress MU Domain Mapping” plugin to be able to use separate domain names for different sites (otherwise you’ll only be able to use sub-domains for sites, such as: site1.example.com, site2.example.com, site3.example.com).
  4. In the website’s settings (or directly in the HTTP and SSL VirtualHost files), add your list of sub-domains and full-domains into theServerAlias field. Make sure redirects are turned off.
  5. If hosting (i.e., not local dev), you’ll need to make sure that you have proper DNS set up for:
    • Each site’s domain name with a “CNAME” record resolving to the base (primary) domain name.
    • Wildcard (*) on the base (primary) domain’s host (sub-domains) with a “A” record resolving to the server’s IP address.
    • And of course the base domain name resolved to the server’s IP address.
  6. Make sure to clear your Browser’s cookies and cache.

How to debug on production server

First of all its very bad practice to debug on the production server.

but sometime the situation arrives where we have to debug on the production server.


here is the few technique sharing to debug on production server.

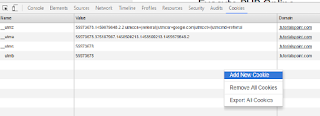
1.  Debug Using Cookies.

Install Crome Extension cookies inspector .


Add Cookies Name : tester
Now Write A code to check is cookies is available or not

if(isset($_COOKIE['tester'])) {
    // Write your debug code here.
}


That all.

Migrating WordPress To A New Server

When you are developing any website you will always have different environments for your website, the number of environments you need will depend on the size of the project and how many people are involved in the project.
The main environments you will find in any website project are:
  • Development Server - The developers local machine to development the website.
  • Testing Server - Once development is finished this will be where all testing takes place.
  • User Acceptance Testing Server - Where the client will review the changes to the website.
  • Production Server - The live website.
The two environments you will always need to have is a development environment and a production environment. You will normally only have these two environments if the client doesn't need to view the site before it goes live. This means that once the developer has finished working on the site they can simply put this onto the production server. These are normally for the very basic of projects where the developer can simply test on their local development server before going live.

Database Config

In a previous article we discussed about how you can change your wp-config.php file to handle multiple environments and change the database settings of the content. The way we do this is by adding a switch in the wp-config.php to change the database config depending on the server name.
switch( $_SERVER['SERVER_NAME'] )
{
    case 'dev':
  // Dev Environment
 define( 'DB_NAME', 'project_dev' );
 define( 'DB_USER', 'project_dev_user' );
 define( 'DB_PASSWORD', 'password' );
 define( 'DB_HOST', 'localhost' );
 
 define( 'WP_HOME', 'http://project.dev');
 define( 'WP_SITEURL', WP_HOME);
    break;

    case 'uat':
 // UAT Environment
 define( 'DB_NAME', 'project_uat' );
 define( 'DB_USER', 'project_uat_user' );
 define( 'DB_PASSWORD', 'password' );
 define( 'DB_HOST', 'localhost' );
 
 define( 'WP_HOME', 'http://project.uat'); 
 define( 'WP_SITEURL', WP_HOME);
    break;

    case 'live':
 // Production Environment
 define( 'DB_NAME', 'project_live' );
 define( 'DB_USER', 'project_live_user' );
 define( 'DB_PASSWORD', 'password' );
 define( 'DB_HOST', 'localhost' );
 
 define( 'WP_HOME', 'http://project.com'); 
 define( 'WP_SITEURL', WP_HOME); 
    break;
}

Export Database

To export the database you can either use the command line and export a file from there by using the following command
mysqldump -p -u username -h hostname database_name > dbname.sql
Or you can use PHPMyAdmin GUI and export the database from here, if you have PHPMyAdmin installed on your server then you'll most likely be able to get to it by going to http://example.com/phpmyadmin, where you will be presented with a login screen to get access to your database.

Once you have logged in you can export the database by clicking on the export button in the top menu.


This screen will download a sql file of all the data and table structure in the database. You can now use this database file to import into the new database on the other server with all the content and settings from the test environment.

Import Database On New Server

To import your database file into the new server you again will have two options either the command line import or through the PHPMyAdmin GUI. The problem that you might face with using PHPMyAdmin is the upload limit on your application, by default this is most likely set at 2MB therefore if your database file is more than this you will have to use the command line to import your database file.
To import using the command line you need to upload your SQL data file to your server you can do this by using FTP and place your data file in a non-public folder.
Then you can use the following command to import the file into your database.
mysql -p -u username -h hostname database_name < /var/data/backup/dbname.sql

Change Domain In Database

As we were working on our local machines the domain we use in the database will be different than the one used on the other servers. Therefore when you were testing on one environment you will have your development domain in the database for things such as links in the posts, post guids,HOME_URL, SITE_URL, user meta, comments.
This means you will need to replace the old domain and with your new domain, the quickest way of doing this is by running a MySQL search and replace on the old domain to the new domain. The following SQL queries can be ran on your database to change the domain URL in the database all you have to replace the olddomain.com with your test environment domain and replace thenewdomain.com with your name server domain.
UPDATE `wp_commentmeta` SET `meta_value` = replace(meta_value, 'http://olddomain.com', 'http://newdomain.com');
UPDATE `wp_comments` SET `comment_content` = replace(comment_content, 'http://olddomain.com', 'http://newdomain.com');
UPDATE `wp_options` SET `option_value` = replace(option_value, 'http://olddomain.com', 'http://newdomain.com');
UPDATE `wp_posts` SET `post_content` = replace(post_content, 'http://olddomain.com', 'http://newdomain.com');
UPDATE `wp_posts` SET `guid` = replace(guid, 'http://olddomain.com', 'http://newdomain.com');
UPDATE `wp_postmeta` SET `meta_value` = replace(meta_value, 'http://olddomain.com', 'http://newdomain.com');
UPDATE `wp_usermeta` SET `meta_value` = replace(meta_value, 'olddomain.com', 'newdomain.com');

Multisite Tables

Within a multisite install you will have additional tables that you need to change the domain one, therefore if you have this setup you can use the following queries.
UPDATE `wp_blogs` SET `domain` = replace(domain, 'olddomain.com', 'newdomain.com');
UPDATE `wp_site` SET `domain` = replace(domain, 'olddomain.com', 'newdomain.com');
UPDATE `wp_sitemeta` SET `meta_value` = replace(meta_value, 'http://olddomain.com', 'http://newdomain.com');

All-in-One WordPress Migration Plugin

 You can use the plugin All-in_one WordPress Migration to help move your theme files, media files, plugins and export your database.
The plugin allows you to export your database, media files, plugins, and themes. You can apply unlimited find and replace operations on your database and the plugin will also fix any serialization problems that occur during find/replace operations.

Plugin Download Link : https://wordpress.org/plugins/all-in-one-wp-migration/

Get A List Of Registered Actions In WordPress

WordPress actions and filters is an event driven architecture that allow you to run specific code at certain times in your application. To do this WordPress uses two functions the add_action() to add new callback functions to an action, and the do_action() function which will run all the callback functions assigned to this action.
In a recent project I was testing some code that used AJAX to run an action in a WordPress plugin. The problem I was having was that this action wasn't being called when it should of been, because this was using AJAX I needed a way of finding out if the code that add the action was actually being ran.
So I needed a way of finding out if the action I add was registered with WordPress so it understood what code to run on this action.
Whenever you want to add an action to WordPress you need to use the function add_action(), the code underneath this will add a new element to an array called $wp_filter.
Then if you look at the function that runs the actions do_action() function this will search for the action in the same $wp_filter variable. Which means all the registered actions will be added to this array, so if you want to view what actions have been registered at a certain time in your code you simply have to print out the elements in this array.
global $wp_filter;

echo '<pre>';
print_r($wp_filter);
echo '</pre>';

Debugging In WordPress

Debugging your website is very important for any project, you will need to be able to debug your site in all the difference environments from local to live. But depending on the environment you will want to debug in different ways.
For example on your local environment you may want to output all PHP errors on the screen to make it easier to fix the problems, but you will not want any of these errors to be displayed on the screen in your live environment. You won't want to display these errors to the visitors of your website, but you will also want to catch these errors and store them in a place you can see what is going wrong.
The advantage of storing these errors allows you to come in at a later date and fix any errors that might be happening on your live site.
WordPress comes with a built in debugging system thats allows you to catch/display errors in any way you want, changing these settings in the wp-config.php file allows you to change how you debug in different environments.

WP_DEBUG

The WP_DEBUG is a PHP constant that allows you to put WordPress into debug mode, when WordPress is in debug mode it allows you to define if you want to output the error on the screen or into a debug log file.
If you want to turn on debug you need to add the following line in your wp-config.php file.
// Turn on wp_debug
define('WP_DEBUG', true);

// Turn off wp_debug
define('WP_DEBUG', false);
When WP_DEBUG is enabled it will override the default error_reporting settings in your php.ini file and change it to display all PHP errors, notices and warnings. Displaying errors will show problems that will break your code. Notices and warnings will display problems with the code that may not break the site but do not following correct PHP guidelines.

WP_DEBUG_LOG

If you want to log all the errors into a file so you can investigate them later then you should use the constant WP_DEBUG_LOG in your wp-config.php file. When this constant is set to true it will output all errors into a file debug.log which will be stored inside the wp-content folder.
define('WP_DEBUG_LOG', true);

WP_DEBUG_DISPLAY

By default the WordPress errors will be displayed on the screen, if you are just logging the errors in a debug.log file then you might want to turn off displaying the errors on the screen but setting the constant to false.
define('WP_DEBUG_DISPLAY', false);

SCRIPT_DEBUG

By default WordPress core will use minified versions of CSS and JS files, if you want to change this to make WordPress use the full dev version of the CSS and JS then you can set the SCRIPT_DEBUGvariable to true.
define('SCRIPT_DEBUG', true);

SAVEQUERIES

To debug database queries you can use this constant variable SAVEQUERIES, this will store each query that is made on the database and how long it takes to execute. Be aware that this can slow down your site so only make sure this is only turned on while debugging.
define('SAVEQUERIES', true);
To check on these queries you can access them in the global variable $wpdb.
echo '<pre>';
var_dump($wpdb->queries);
echo '</pre>';

Changing Debug Depending On Environment

Understanding what these different settings means that we can make sure that we only do certain things depending on the environment.
Dev In development environment you would want to turn on debugging, display them on the screen and store the errors in the debug file.
UAT In a UAT environment you would still want debug on but you won't want to display these on the screen so we can store them in the debug file.
Live In the Live environment you would of hopefully resolved all the errors in your code so you can turn off debugging.
To change this in the wp-config.php you can use the following code.
switch( $_SERVER['SERVER_NAME'])
{
    // Dev
    case 'dev.example.com':
        define('WP_DEBUG', true);
        define('WP_DEBUG_LOG', true);

        define('ENV', 'dev');
    break;
    
    // UAT
    case 'uat.example.com':
        define('WP_DEBUG', true);
        define('WP_DEBUG_LOG', true);
        define('WP_DEBUG_DISPLAY', false);

        define('ENV', 'uat');
    break;
    
    // Live
    case 'live.example.com':
        define('WP_DEBUG', false);

        define('ENV', 'live');
    break;
}

Disable Emojicons Introduced In WordPress 4.2

As of WordPress version 4.2 WordPress enabled the use of Emojicons in your posts, but in order to do this it will automatically add some javascript to your page. But if you don't use Emojicons then it's adding pointless Javascript to the page which you will never use.
If you look inside the file /wp-includes/default-filters.php you will see all the filters and actions that are used to add the emoji code, all you have to do is search for the word emoji in this file to see the instances of these filters and actions.
Then you will have to go through each of these and remove them in your own code by using the functions remove_filter and remove_action which can be ran on the init action.
function pu_remove_emojicons() 
{
    // Remove from comment feed and RSS
    remove_filter( 'the_content_feed', 'wp_staticize_emoji' );
    remove_filter( 'comment_text_rss', 'wp_staticize_emoji' );

    // Remove from emails
    remove_filter( 'wp_mail', 'wp_staticize_emoji_for_email' );

    // Remove from head tag
    remove_action( 'wp_head', 'print_emoji_detection_script', 7 );

    // Remove from print related styling
    remove_action( 'wp_print_styles', 'print_emoji_styles' );

    // Remove from admin area
    remove_action( 'admin_print_scripts', 'print_emoji_detection_script' );
    remove_action( 'admin_print_styles', 'print_emoji_styles' );
}
add_action( 'init', 'pu_remove_emojicons' );

Reduce Comment Spam With htaccess in Wordpress

Comment spam is a problem with many blogs, one of the biggest is spam bots crawling sites and automatically submitting comments to your site. The below code snippet will check the HTTP_REFERER on the wp-comments-post.php, it will make sure that you can only get to this page if you are on the current domain.
Below is a snippet you can use on your .htaccess to help reduce the amount of spam coming through on your comments page on your WordPress blog.
Just add the following into your htaccess file to reduce spammers.
<IfModule mod_rewrite.c> 
RewriteEngine On 
RewriteCond %{REQUEST_METHOD} POST 
RewriteCond %{REQUEST_URI} .wp-comments-post.php* 
RewriteCond %{HTTP_REFERER} !.*yourdomainname.* [OR] 
RewriteCond %{HTTP_USER_AGENT} ^$ 
RewriteRule (.*) ^http://%{REMOTE_ADDR}/$ [R=301,L] 
</IfModule>
This snippet will check the the URL coming to the wp-comments-post.php file is from your own domain.

Access Database Outside Of WordPress

Sometimes I've needed to build a new page outside of WordPress but still have the ability to access the WordPress database from this new page. This would normally use custom tables you've created.
To access the WordPress database normally you would just need to use the global variable $wpdb. This object connects to your database using the credentials found in the wp-config.php in the constant variables DB_NAME, DB_HOST, DB_USER, DB_PASSWORD.
function access_db()
{
   global $wpdb;
}
The $wpdb object has a number of methods that you can use to interact with the database, you are able to use the following:
  • query() - To run a custom SQL query on the database.
  • get_var() - Get a single value from the database and add as a variable.
  • get_row() - Get the single row from the database.
  • get_col() - Get the column information from the database.
  • get_results() - Get all the results from SQL query.
  • insert() - Insert a row into the database
  • replace() - Replace the data in the row.
  • update() - Allows you to update a row in the database.
  • delete() - Allows you to delete a row from the database.
  • prepare() - Used for SQL escaping when processing the SQL query.
If you're using custom database tables in your application then you will be able to access them by using the $wpdb object and writing your own custom queries.
For more information on creating custom tables in WordPress use this tutorial.
If you're creating a page outside of the WordPress application you won't have access to the $wpdb object, so you will need to instantiate the WordPress application before you can access it. To do this in WordPress it's very easy. If you look at the .htaccess file you will see some code like this.
# BEGIN WordPress
<IfModule mod_rewrite.c>
RewriteEngine On

RewriteBase /
RewriteRule ^index\.php$ - [L]
RewriteCond %{REQUEST_FILENAME} !-f
RewriteCond %{REQUEST_FILENAME} !-d
RewriteRule . /index.php [L]
</IfModule>
# END WordPress
This will send all requests on the domain to go through the index.php file, then if you look inside the index.php file you will see how WordPress will be loaded, simply by loading the file wp-blog-header.php.
require( dirname( __FILE__ ) . '/wp-blog-header.php' );
When this is loaded it will create the WordPress application and instantiate all the variables that you will need. You will have access to the $wpdb object which will automatically connect to the datbase in the wp-config.php file.
Now you will be able to use this variable in your new page outside of the WordPress application.
Create a new file, this example is a new file at the root level of your WordPress files. First require the wp-blog-header.php file and this will instantiate WordPress outside of the application.
<?php
// Get access to WordPress
require( dirname( __FILE__ ) . '/wp-blog-header.php' );

// Get all posts
$posts = $wpdb->get_results('SELECT * FROM '. $wpdb->prefix.'posts');